The Ultimate Guide to DIY Beaded Bag Charms
If you’ve scrolled through social media lately, you’ve likely noticed that “arm candy” isn’t just for your wrists anymore. Bag charms are having a major moment. From whimsical sea-inspired dangles to chunky, colorful bead strands, these little accessories are the perfect way to inject personality into a basic tote or a classic handbag.
The “Jane Birkin” aesthetic is officially back, and it’s all about making your luxury (or everyday) bags feel lived-in, loved, and uniquely yours. One of the best ways to achieve this is through a DIY bag charm.
Forget the mass-produced plastic keychains. We’re talking about a curated, jangling mix of sea glass, shells, and vibrant beads that tell a story. Here is how you can recreate the whimsical, coastal-inspired charm.
Gathering Your Materials
Before you start, lay out your supplies. Looking at our toolkit, we’re going for a mix of coastal vibes and vibrant pops of color.


The Essentials
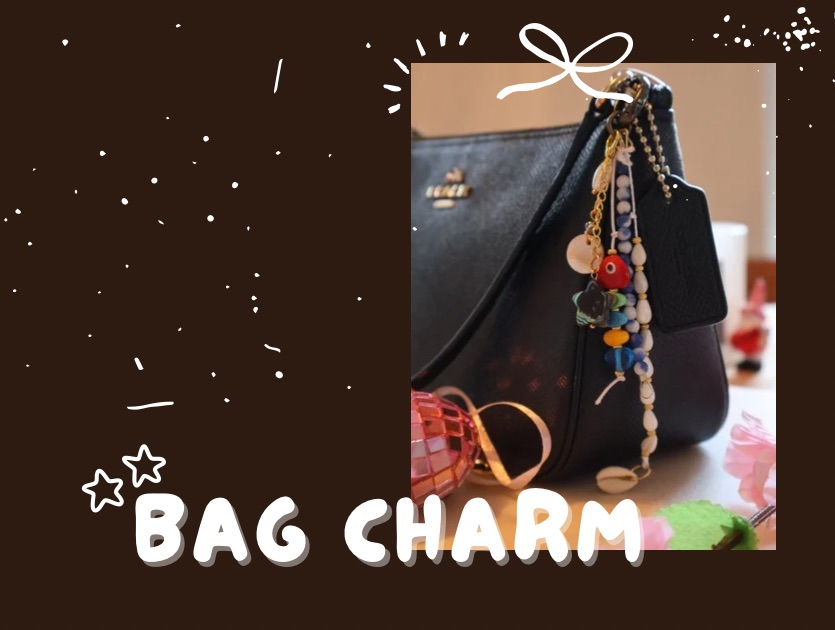
- Beads: A variety of sizes and textures. We’re using a rainbow palette of round glass beads, plus some specialty “long” white teardrop beads.
- Charms & Pendants: Look for unique focal pieces like shells, mother-of-pearl stars, or even a fun “fish” bead.
- Cord: High-quality elastic cord (like the 9.1m spool shown) is great for flexible dangles, but you can also use nylon thread for a stiffer look.
- Findings: * Lobster Clasps: To attach the charm to your bag.
- Jump Rings: To connect charms to the main strand.
- Eye Pins/Head Pins: For creating individual bead dangles.
- Tools: Needle-nose pliers (for opening jump rings) and sharp scissors.
Step-by-Step Directions
Step 1: Design Your Layout
Don’t start stringing just yet! Lay your beads and charms out on a flat surface.
- The Focal Point: Decide if you want one long strand or several tiered “dangles.”
- Color Blocking: Try a gradient effect (like the rainbow beads in the photo) or a rhythmic pattern of blue and white.
Step 2: Prepare Your Charms
If you have individual shell or star pendants, attach them to a jump ring first.
Pro Tip: When opening a jump ring, twist the ends sideways rather than pulling them apart. This preserves the circular shape and makes it easier to close securely.
Step 3: Stringing the Main Strand
Cut a length of elastic cord about 12 inches long (it’s better to have too much than too little).
- Tie a temporary “stopper” bead at one end or tape it to the table.
- Begin threading your beads in your chosen pattern.
- Mix in your specialty beads—like the white teardrops—to add texture and vertical interest.
Step 4: Adding the Hardware
Once your beads are strung:
- Thread the end of your cord through the loop of a lobster clasp.
- Tie a very secure surgeon’s knot (a square knot with an extra pass).
- Add a tiny drop of clear glue or nail polish to the knot for extra security, then tuck the “tail” of the cord back into the nearest bead.
Step 5: The Finishing Touches
Now, use your jump rings to attach your dangling charms (like the star or the fish) to the chain or the bottom of your bead strand. This creates that “clustered” look that makes bag charms so eye-catching.
Pro Tips & Tricks for a High-End Finish
- The “Burn” Technique: If using synthetic nylon cord, carefully use a lighter to singe the very tip of the cord into a point. This makes it act like a needle, making it much easier to thread small beads without a tool.
- Strategic Knotting: Tie a knot directly under your “heavier” beads (like the glass fish or large shell). This keeps them from sliding around and ensures the strand drapes exactly how you designed it.
- Weight Distribution: Place your heaviest or longest strand in the center of the clasp. This ensures the charm hangs straight down rather than pulling the bag’s zipper or hardware to one side.
- The “Old & New” Mix: For the most engaging look, mix brand-new craft store beads with “found” items, like a shell from a favorite beach or a charm from a piece of vintage jewelry you no longer wear.
Styling Your Charm
Don’t be afraid to go big! You can clip your new creation onto:
- The base of a backpack strap.
- The zipper pull of a makeup bag.
- The handle of a neutral leather tote to give it a “pop.”