The Art of the Handmade Heart
There is a profound satisfaction in slow crafting—the act of taking simple, raw materials and transforming them into something that carries the warmth of the human hand. These hanging hearts, inspired by Scandinavian folk art, are the perfect project for a quiet afternoon.
Whether you are a seasoned sewist or picking up a needle for the first time, the beauty of this project lies in the intentional textures. Here is the comprehensive guide to creating your own heirloom-quality fabric hearts.
This project is the perfect way to add a touch of handmade charm to your home for Valentine’s Day (or any time you want to spread a little love). These Rustic Fabric Heart Ornaments are incredibly versatile—you can hang them on a grapevine wreath, drape them over a door handle, or even gift them as a sweet handmade token.
Here is a step-by-step guide to creating your own heart trio!


Materials Required
Before you start, gather these essentials. Most of these can be found in a basic sewing kit or salvaged from fabric scraps:
- Fabric Scraps: A mix of textures works best. Think linen, cotton, or even patterned lace for a vintage feel.
- Cardboard or Cardstock: To create your heart template.
- Fabric Scissors: For clean, sharp edges.
- Embroidery Floss & Needles: For decorative stitching and sewing the hearts together.
- Fiberfill or Poly-fill: To give your hearts their plush, 3D shape.
- Twine or Thin Ribbon: For the hanging loops.
- Marking Pen: A heat-erasable pen or tailor’s chalk is ideal.
- Optional: Small beads or extra embroidery thread for floral details.
Step-by-Step Instructions
1. Create Your Template
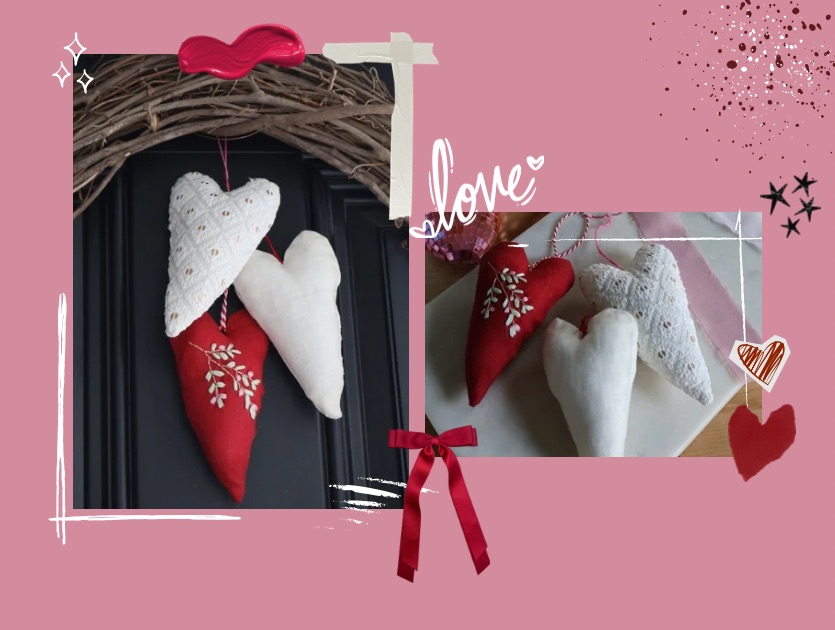
Trace a heart shape onto your piece of cardboard. Notice in the image that the hearts are slightly “elongated” or “primitive” in style—don’t worry about perfect symmetry! Once you’re happy with the shape, cut it out.
2. Trace and Cut the Fabric
Fold your chosen fabric in half so the “right sides” are facing each other. Trace your template onto the fabric. Cut out the shape, leaving about a 1/4 inch seam allowance outside your traced line. Repeat this for all three/Four hearts.
3. Add Custom Embroidery (Optional)
If you want to add a floral design like the red heart in the photo, do this now! Use a simple lazy daisy stitch for leaves and small French knots for flowers. It’s much easier to embroider the fabric before it is stuffed.
4. Stitching it Together
- Option A (Invisible Seam): Pin the fabric pieces with right sides together. Sew along your traced line, leaving a 1-inch gap on one of the straight sides. Turn it right-side out.
- Option B (Rustic Exposed Seam): Place the fabric pieces with “wrong sides” together and use a blanket stitch or a simple running stitch around the edge, leaving a gap for stuffing.
5. Stuffing and Finishing
Gently push small handfuls of fiberfill/poly-fill into the heart. Use the end of a pen to push stuffing into the bottom point of the heart. Once it’s nice and plump, sew the opening closed.
Tip: Never use one big ball of stuffing; it creates a lumpy, “cottage cheese” texture. Instead, tease the fiberfill apart into small, cloud-like wisps.
6. Add the Hanging Loop
Thread a piece of twine or embroidery floss through the top center of the heart. Tie a knot to create a loop, and your ornament is ready to hang!
Tip: For a more expensive, high-quality feel, drop a teaspoon of dried rice or poly-pellets into the bottom point of the heart before adding the fiberfill. The slight weight ensures the heart hangs straight and doesn’t bounce around when the door opens.
Tips & Tricks for Success
- Mix Your Textures: As seen in the first image, using one lace heart, one plain linen, and one embroidered heart creates a professional, “curated” look.
- The “Pencil Trick”: When stuffing narrow points, use a dull pencil or a chopstick to ensure the stuffing reaches the very tip without poking through the fabric.
- Scented Hearts: Add a tablespoon of dried lavender or a drop of essential oil to the stuffing to turn these into beautiful drawer sachets.
- Batch Produce: Since these are small, it’s much faster to trace and cut 10 at a time. They make wonderful “galentine” gifts!

