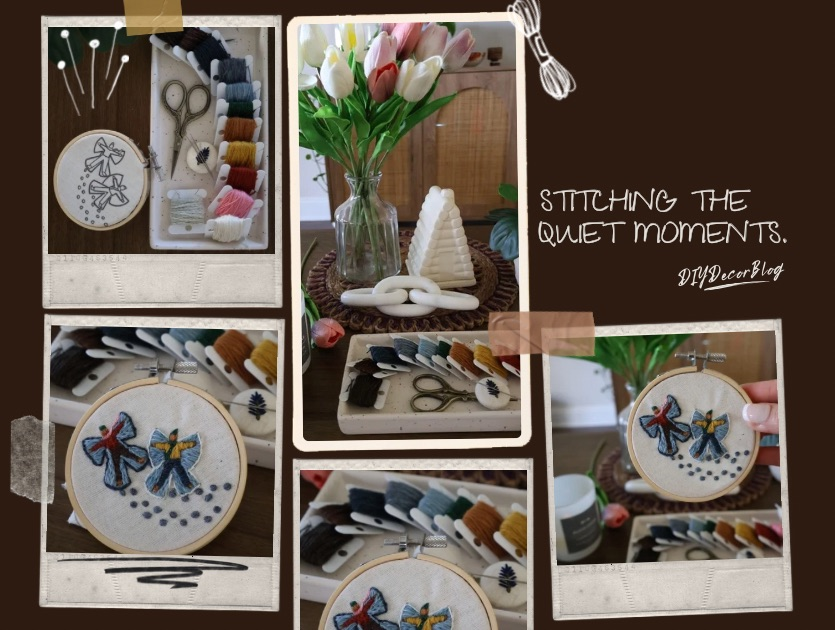
A Winter Embroidery Project
There is something inherently nostalgic about making snow angels—the crisp air, the heavy weight of a winter coat, and that perfect, sparkling crust of fresh snow. When I saw this “Snow Place I’d Rather Be” illustration, I knew I had to capture that cozy feeling with needle and thread.
Embroidery is the perfect medium for this piece because it allows for so much texture. From the fuzzy wool of the red beanie to the “carved out” look of the snow wings, every element offers a chance to play with different stitches.
Whether you’re a seasoned stitcher or a beginner looking for a winter project, this piece is all about embracing the “hand-drawn” look. It doesn’t need to be perfect; in fact, the slight wobbliness of the lines is what gives it that heartfelt, storybook charm.
Grab a cup of warm drink, find your favorite hoop, and let’s get stitching!


Materials You’ll Need
- Fabric: A 6″ circle of light beige/blue linen or high-quality cotton (to mimic the icy sky).
- Hoop: 4 inch wooden embroidery hoop.
- Needles: Size 3 0r 5 embroidery needles.
- Transfer Tool: A water-soluble marking pen or “Stick ‘n Stitch” stabilizer paper.
- Embroidery Floss-DMC Suggestions (My Favorite for this project are DMC Eco-vita).
- Red: #503 (Jacket & Hat)
- Brown: #105 (Pant)
- Pink: #404 (Scarf & Pocket)
- Dark Brown: #103 (Shoes, Hat & Mittens)
- Orange: #304 (Jacket)
- Dark Blue: #608 (Pant & Hat)
- Green #708 (Scarf)
- Light Brown: #2 (Faces)
- Sky Blue: #604 (Snow Border)
- Blue: #605 (Snow)
- CornFlower Blue: #604 (Steps)
- White: #1 (Highlights)
Step-by-Step Instructions
Step 1: Transfer the Design
Place your fabric over the printed design and trace it using your water-soluble pen.
Tip: Make sure to trace the “scuff marks” (the little blue dots and dashes) around the angels’ feet—these small details give the piece movement and make the snow feel “real.”
Step 2: The “Carved” Snow Wings
The wings are the focal point. To make them look like they were actually swept into the snow:
Use #604, #605.
Work in a Satin Stitch, but instead of horizontal lines, stitch in a “fan” motion starting from the body and moving outward to the edge of the wing.
Outline the very edge of the wings with a Split Stitch (#604) to give them a crisp border.
Step 3: Stitching the Winter Gear
We want the clothing to look thick and warm!
- The Jackets: Use a Brick Stitch or Long and Short Stitch. This creates a slightly raised, textured surface that mimics the look of a puffer jacket.
- The Scarves: Use a Stem Stitch in a tight spiral or row. This mimics the “twist” of knitted wool.
- The Hats: Add a tiny French Knot at the top of the hats for a pom-pom effect.
Step 4: Faces and Fine Details
The Boots: Use a Satin Stitch in dark brown, making sure to keep the “L” shape of the feet clear.
Skin/Hair: A simple tiny vertical stitch for the eyes is all you need.
How to Display
Once finished, wash away your marking lines with cool water and let the fabric air dry. Iron the back carefully, then “lace” the back of your hoop or frame it in a shadow box to preserve the texture of the stitches.


